Tally and Slack Integration: Automatic Notifications in the Channel
Tally is a free no-code service-constructor for fast and convenient creation of online forms designed to collect client or user information. Slack is a corporate messenger with a simple interface, created for work communication within teams. Do you use both programs in your work? Want to know how to increase the speed and efficiency of working with them? A proven and really effective way is to automate the transfer of data from one system to another. To achieve this, you need to integrate them using an online connector. From our article, you will learn how to set up Tally and Slack integration. Having done this, you will receive automatic transfer of data from forms to the corporate messenger.
Why Automate Data Transfer from Tally to Slack
The main benefits of automating the process of transferring data from Tally to Slack:
- Elimination of input errors. Manual data transfer often involves the risk of errors (missing a digit in a phone number or a letter in an email address), which can lead to the loss of a client. Automating this process eliminates such shortcomings.
- Speed of information processing. Automatic transfer ensures immediate data transfer. This significantly accelerates the process compared to the manual method.
- Uninterrupted operation 24/7. The automated data transfer system operates around the clock. It does not need breaks, weekends, or holidays. It does not require rest and is not subject to fatigue.
- Improving manager efficiency. Automation frees specialists from routine data transfer work, allowing them to focus on creative, more complex, and important tasks.
- Increased overall productivity. By automating data transfer, you can accomplish more tasks in the same amount of time, thereby increasing your personal efficiency, as well as the effectiveness of your department and the company as a whole.
After setting up Slack and Tally integration via our codeless online connector ApiX-Drive, you will be able to get the results almost immediately. Customer data from the forms will be automatically transferred to the corporate messenger as new notifications. You will no longer have to manually transfer names, surnames, phone numbers, email addresses, and other significant data. This will significantly simplify your work, improve interaction with customers, and increase the speed of feedback. And, finally, this allows you to get ahead of competitors who have not yet used automation in their sales.
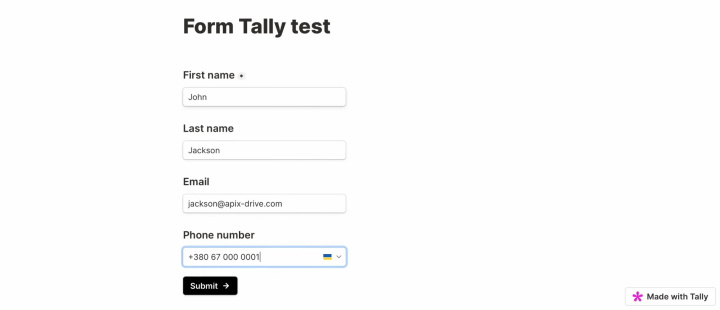
![Tally and Slack integration | Lead data form Tally and Slack integration | Lead data form](/media/blogimg/w720/en/f8f269355afbd38b94e7970df245a2ee.jpg)
![Tally and Slack integration | Result of the data transfer to Slack Tally and Slack integration | Result of the data transfer to Slack](/media/blogimg/w720/en/ce6eceb7926e2d8f6efe94a5aa7ad6f7.jpg)
How to Set Up Tally and Slack Integration
To perform Tally + Slack integration, you will not need to study programming or understand the intricacies of the API. You will not need to seek help from third-party specialists. Our online connector, ApiX-Drive will take care of the entire setup process. This service has everything you need to quickly and easily connect systems. Its intuitive interface and logic of operation allow even a person with minimal experience to successfully complete the task in just 10 minutes.
So, let's get started. First, register on the official website, apix-drive.com. Thereafter, you can proceed to Slack + Tally integration.
Setting Up the Data Source – Tally
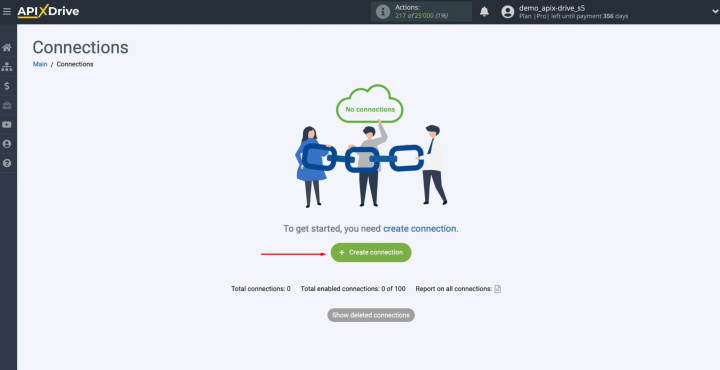
To set up the Tally integration with Slack, first, create a new connection. To achieve this, click on the green button.
![Tally and Slack integration | Create a new connection Tally and Slack integration | Create a new connection](/media/blogimg/w720/en/3d4c0328d4d3cdda58dfb8d5d73b5ff0.jpg)
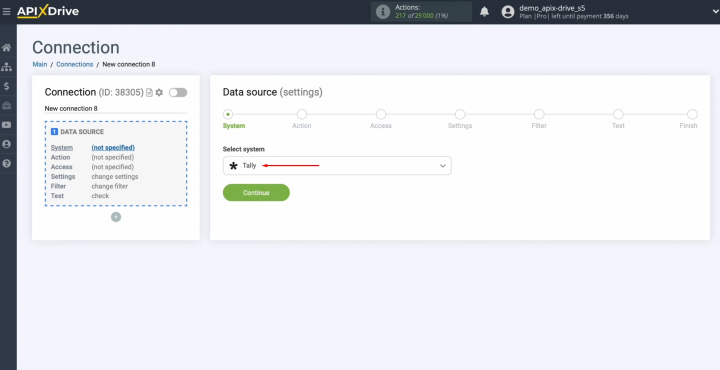
Select the
data source system. You need Tally. Click “Continue”.
![Tally and Slack integration | Select Tally as the data source system Tally and Slack integration | Select Tally as the data source system](/media/blogimg/w720/en/bb72405842499b44fea7cd81e9a8488f.jpg)
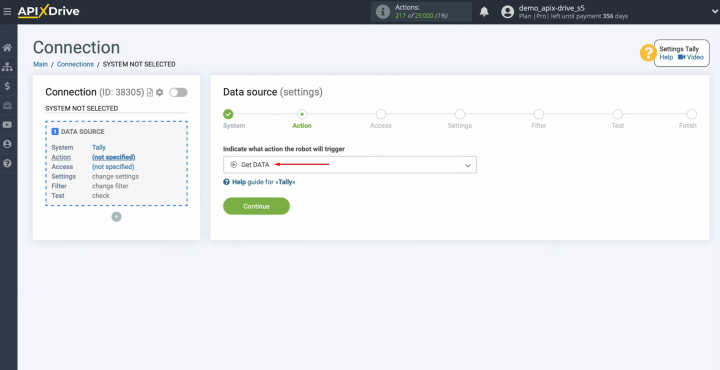
Choose the action
"Get DATA". Click
“Continue”.
![Tally and Slack integration | Choose the action "Get DATA" Tally and Slack integration | Choose the action "Get DATA"](/media/blogimg/w720/en/2b9c559f4ce07908dc49db0448403665.jpg)
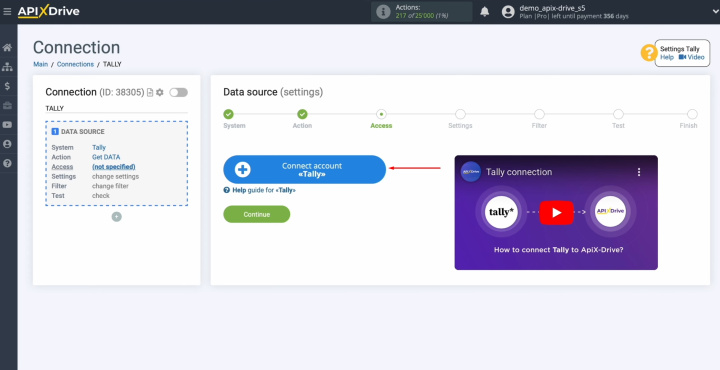
Connect your Tally
account to ApiX-Drive. To do this, click on the appropriate button.
![Tally and Slack integration | Connect your Tally account to ApiX-Drive Tally and Slack integration | Connect your Tally account to ApiX-Drive](/media/blogimg/w720/en/201ddfbd28da41acd5d29d95d501b230.jpg)
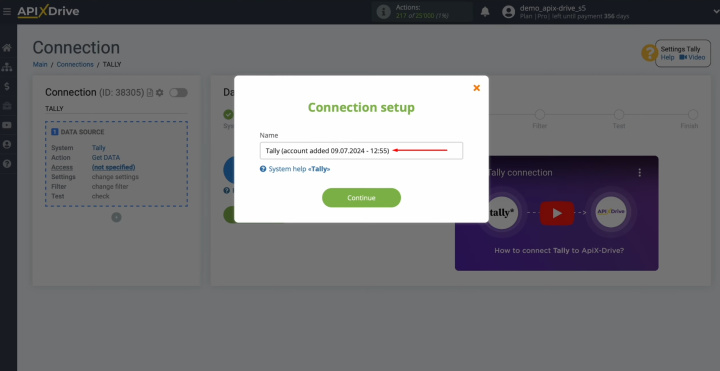
Here, you can
change the name of the connection or just click "Continue".
![Tally and Slack integration | Change the name of the connection or just click "Continue" Tally and Slack integration | Change the name of the connection or just click "Continue"](/media/blogimg/w720/en/6776deb71b2fc236dcd7379f37dd0df0.jpg)
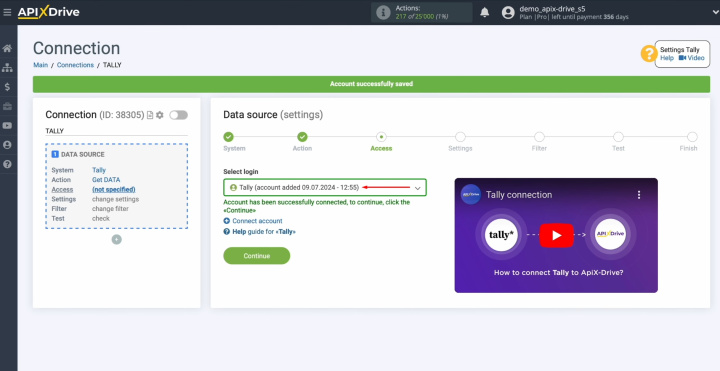
When the connected
account appears in the list, select it and click "Continue".
![Tally and Slack integration | Select the connected account Tally and Slack integration | Select the connected account](/media/blogimg/w720/en/8e8a0eac7489303af1f3e997df5c1787.jpg)
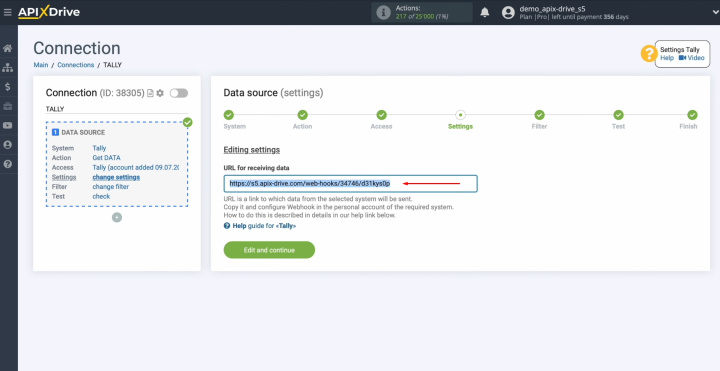
Now, you see
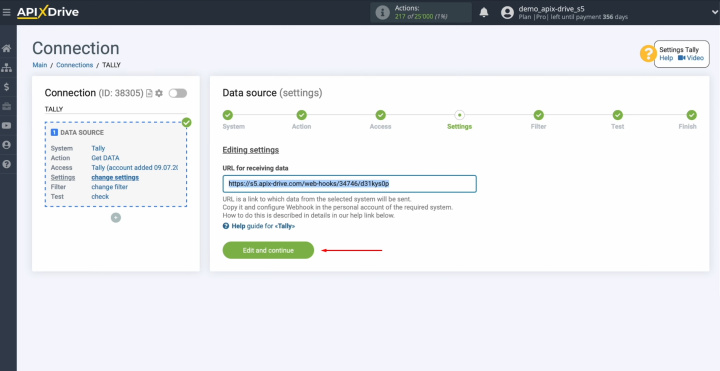
the URL for receiving data. This is the URL where new leads will come from Tally. To continue setting up, copy it.
![Tally and Slack integration | Copy the URL for receiving data Tally and Slack integration | Copy the URL for receiving data](/media/blogimg/w720/en/4f5336b3315bebfeb3a87148ca4cfa83.jpg)
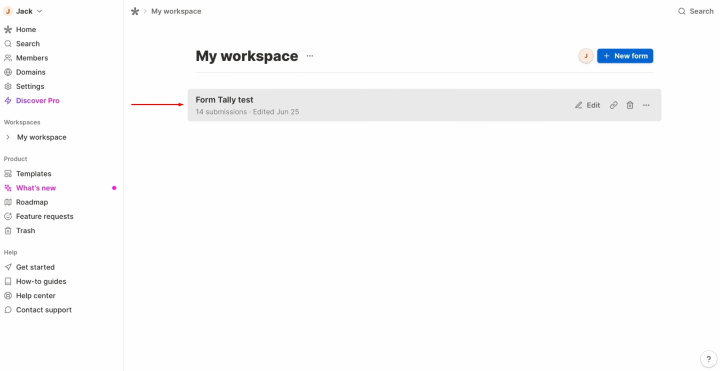
Go to your
Tally account and move on to
setting up the form by which we want to receive new leads.
![Tally and Slack integration | Move on to setting up the form by which we want to receive new leads Tally and Slack integration | Move on to setting up the form by which we want to receive new leads](/media/blogimg/w720/en/530cd8053b9132591a02b47ed16490f2.jpg)
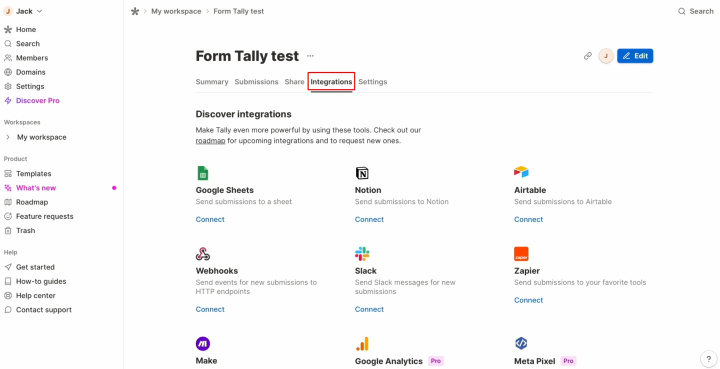
Here, you need the "Integrations"
section.
![Tally and Slack integration | You need the Integration section Tally and Slack integration | You need the Integration section](/media/blogimg/w720/en/2596505b4c5de0d375e9161a5f809ffc.jpg)
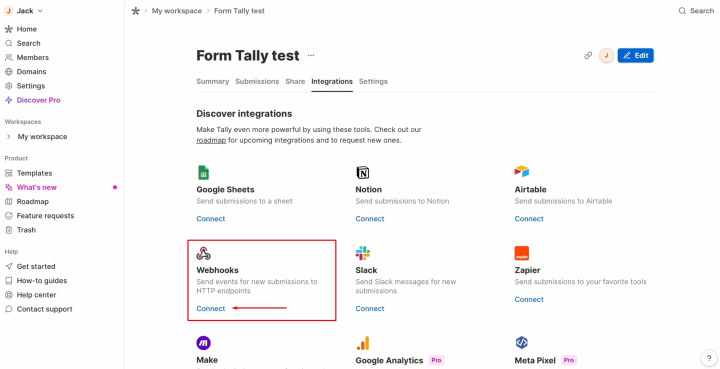
Find the
Webhooks option and click
"Connect".
![Tally and Slack integration | Find the Webhook and click "Connect" Tally and Slack integration | Find the Webhook and click "Connect"](/media/blogimg/w720/en/58bf6139caf2444e09406371f11eda52.jpg)
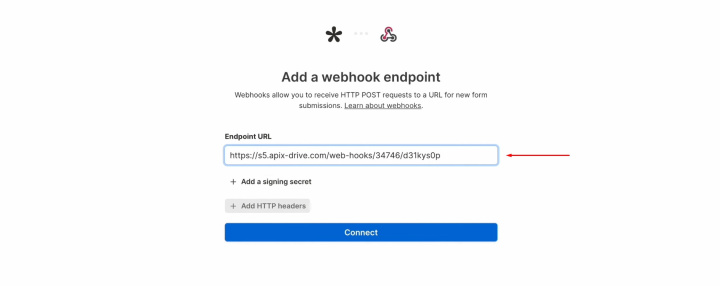
Paste the
copied URL (from ApiX-Drive) and click "Connect", checking that the webhook
system is turned on.
![Tally and Slack integration | Paste the copied URL into the ApiX-Drive system Tally and Slack integration | Paste the copied URL into the ApiX-Drive system](/media/blogimg/w720/en/96edfa14f00cc50abe1d95755ea8bcc9.jpg)
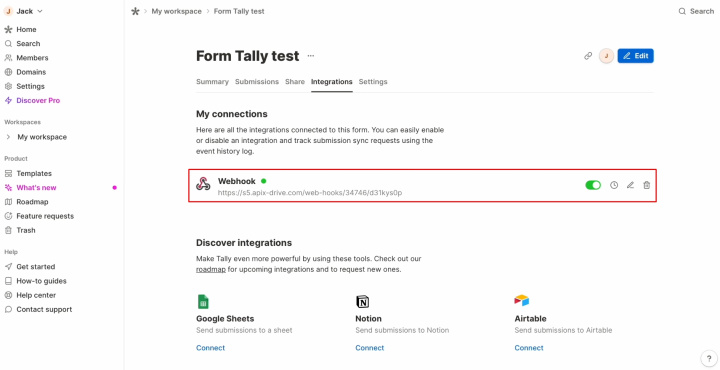
As a result, you should have this.
![Tally and Slack integration | Check that the webhook system is turned on Tally and Slack integration | Check that the webhook system is turned on](/media/blogimg/w720/en/cb120d5432493b852fdbd032bf19f552.jpg)
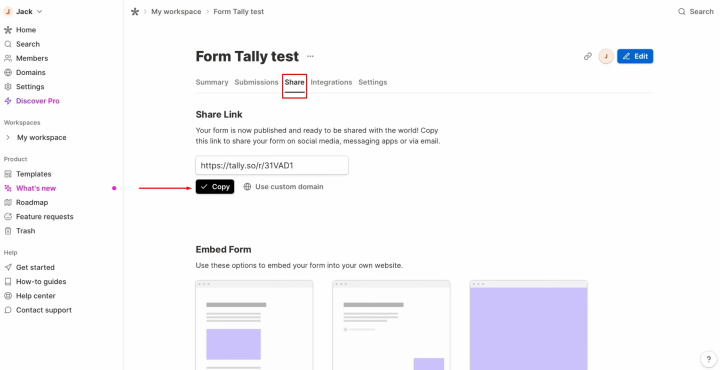
Go to “Share”
and click “Copy”.
![Tally and Slack integration | Go to “Share” and click “Copy” Tally and Slack integration | Go to “Share” and click “Copy”](/media/blogimg/w720/en/2bb3937612224902e885ea6c3dcd18d9.jpg)
Now, generate
test data that will be sent to the specified URL. For this, fill out a form on the
website.

![Tally and Slack integration | Fill out a form on the website Tally and Slack integration | Fill out a form on the website](/media/blogimg/w720/en/29000b4f9b0a05c7375f6dcf58e0e7e2.jpg)
After successfully
filling out the form, return to ApiX-Drive and continue configuration. Click “Edit
and continue”.
![Tally and Slack integration | Return to ApiX-Drive and continue configuration Tally and Slack integration | Return to ApiX-Drive and continue configuration](/media/blogimg/w720/en/43187881a404c6e4e0de9406d51a18a6.jpg)
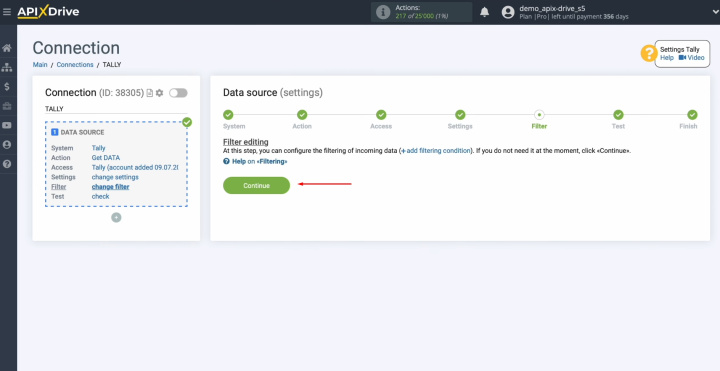
Here, you can
set up a data filter or just click "Continue".
![Tally and Slack integration | Just click "Continue" Tally and Slack integration | Just click "Continue"](/media/blogimg/w720/en/fbcca5c5e59e3d1115823f5f6a8826e1.jpg)
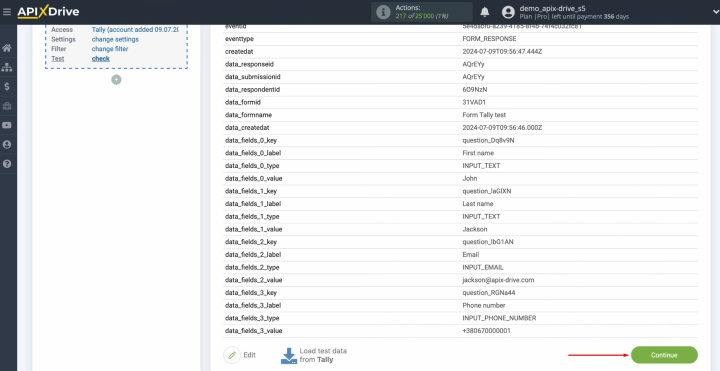
Now, you see
the data that you just filled
out in the form. If there is
no data at this stage, try
following the steps that were described earlier. If you don't want to fix anything, click "Continue".
![Tally and Slack integration | If you don't want to fix anything, click "Continue" Tally and Slack integration | If you don't want to fix anything, click "Continue"](/media/blogimg/w720/en/99377a56f5ba42da637e3e49ee1d7a25.jpg)
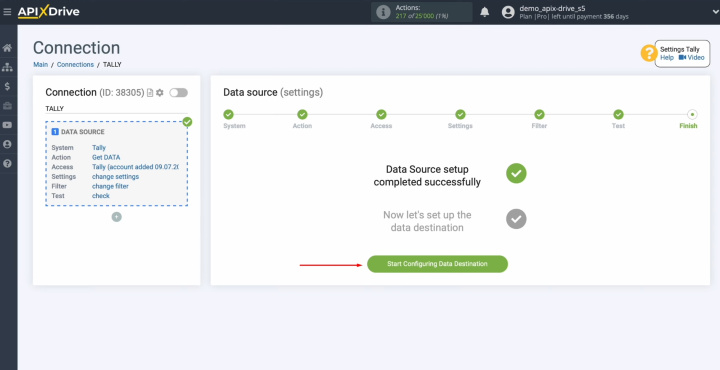
At this stage, setting up Tally as a data source
has been successfully completed.
![YouTube](/landing/images/yt_icon.png)
![How to Connect Google Sheets to Mailgun How to Connect Google Sheets to Mailgun](https://img.youtube.com/vi/3ALKToSGapA/maxresdefault.jpg)
![How to Connect Pipedrive to Smartsheet How to Connect Pipedrive to Smartsheet](https://img.youtube.com/vi/35uBdmi_gik/maxresdefault.jpg)
Setting Up the Data Receiver – Slack
Now, you can proceed to setting up the data receiver. For this, click on the green button.
![Tally and Slack integration | Сlick on the green button Tally and Slack integration | Сlick on the green button](/media/blogimg/w720/en/367f88508b29fcceb069b902c4ce603f.jpg)
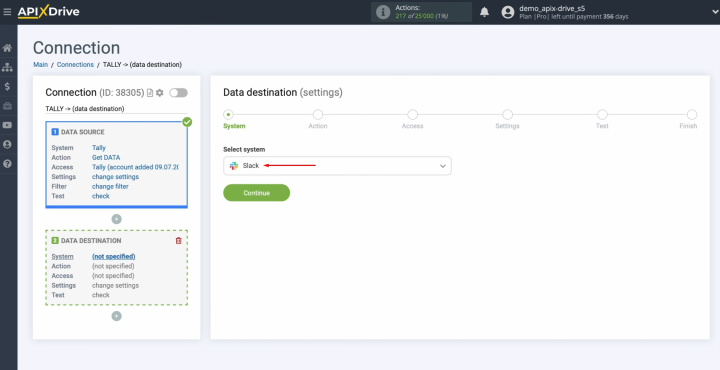
To set up the Slack integration with Tally, select the data receiver system. You need Slack. Click “Continue”.
![Tally and Slack integration | Select Slack as the data receiver system Tally and Slack integration | Select Slack as the data receiver system](/media/blogimg/w720/en/5938489d37078fea454bc6a76f1865c3.jpg)
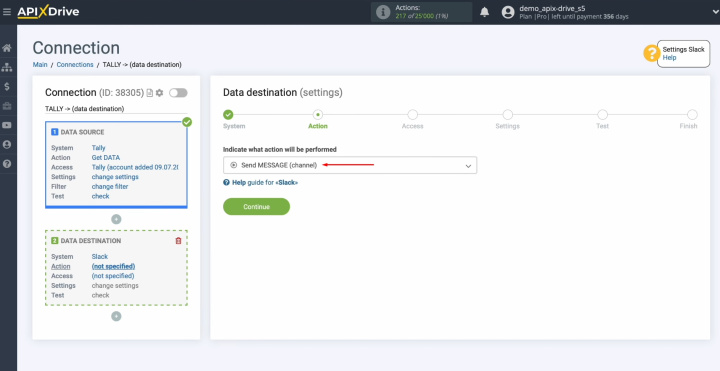
Choose an action
"Send MESSAGE (channel)". Click
“Continue”.
![Tally and Slack integration | Choose an action "Send MESSAGE (channel)" Tally and Slack integration | Choose an action "Send MESSAGE (channel)"](/media/blogimg/w720/en/86cb0d14b978c51e0ff0c78dcd4e886a.jpg)
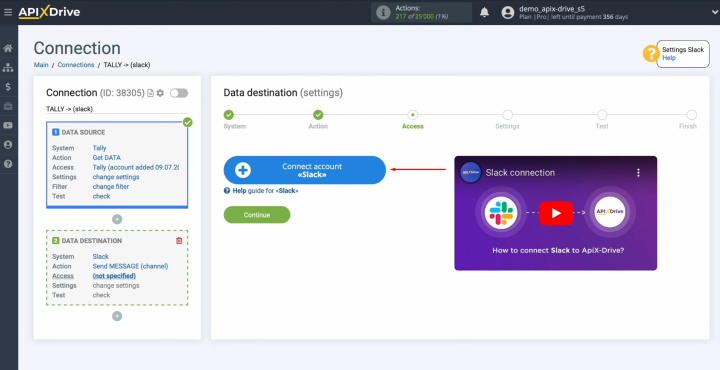
Connect your
Slack account to ApiX-Drive. To do this, click on the appropriate button.
![Tally and Slack integration | Connect your Slack account to ApiX-Drive Tally and Slack integration | Connect your Slack account to ApiX-Drive](/media/blogimg/w720/en/b94c4bcdf44f655929dd79c92533a742.jpg)
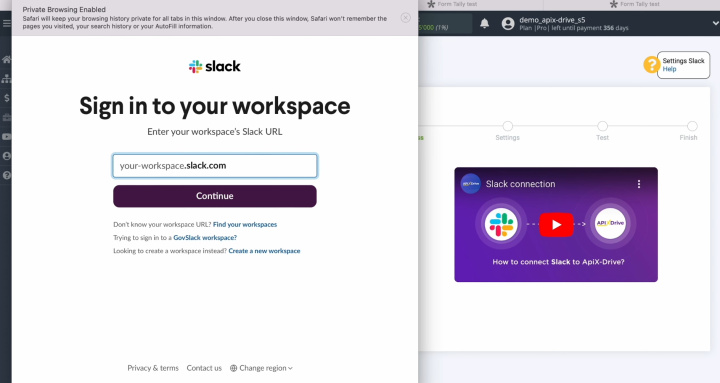
In this
window, you must indicate
your workspace.
![Tally and Slack integration | In this window, you must indicate your workspace Tally and Slack integration | In this window, you must indicate your workspace](/media/blogimg/w720/en/ed025034f1dfb32fb7e6d18be960cb59.jpg)
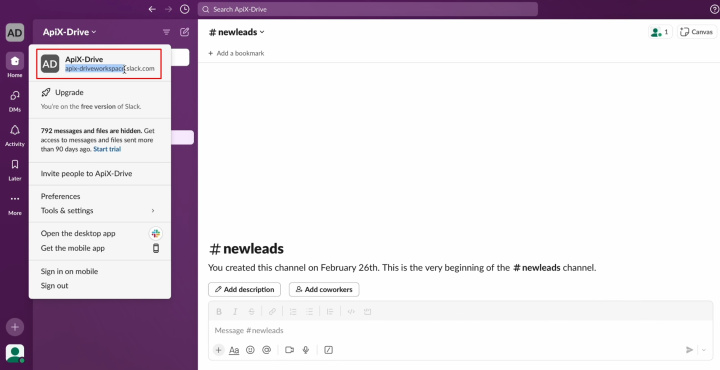
To get the workspace, go to your Slack account and copy the workspace without
additional characters.
![Tally and Slack integration | Go to your Slack account and copy the workspace without additional characters Tally and Slack integration | Go to your Slack account and copy the workspace without additional characters](/media/blogimg/w720/en/3efefd56507da19f6e19357b1c220f67.jpg)
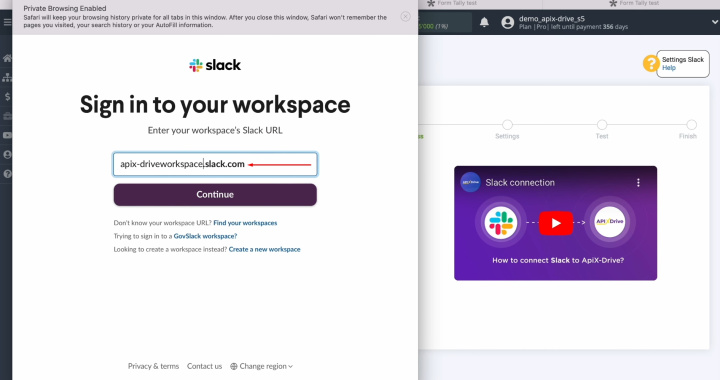
Paste the copied workspace into the
appropriate field. Click “Continue”.
![Tally and Slack integration | Paste the copied workspace into the appropriate field Tally and Slack integration | Paste the copied workspace into the appropriate field](/media/blogimg/w720/en/acbaf74f52b6129da72ac5e002f73773.jpg)
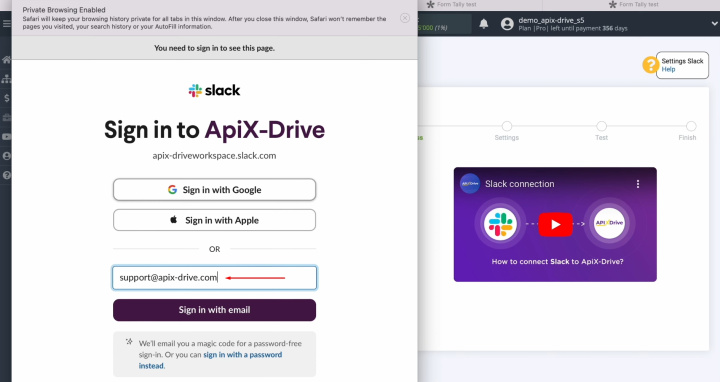
Specify the
login for your Slack personal account. Click “Sign in with email”.
![Tally and Slack integration | Specify the login for your Slack personal account Tally and Slack integration | Specify the login for your Slack personal account](/media/blogimg/w720/en/2feef43280de9f6cacb3f2834dc2efaf.jpg)
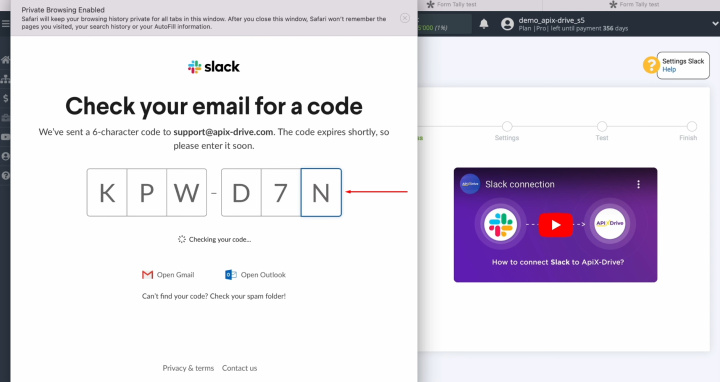
Indicate the
code that was sent to your email.
![Tally and Slack integration | Indicate the code that was sent to your email Tally and Slack integration | Indicate the code that was sent to your email](/media/blogimg/w720/en/662f7d37714698be8afc1ef4c309bb94.jpg)
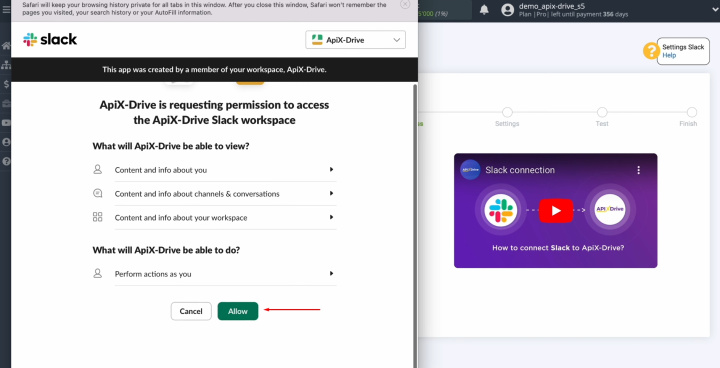
Grant
ApiX-Drive access to work with your Slack account. Click
“Allow”.
![Tally and Slack integration | Grant ApiX-Drive access to work with your Slack account Tally and Slack integration | Grant ApiX-Drive access to work with your Slack account](/media/blogimg/w720/en/77c94081da26638861b2fca40c90978f.jpg)
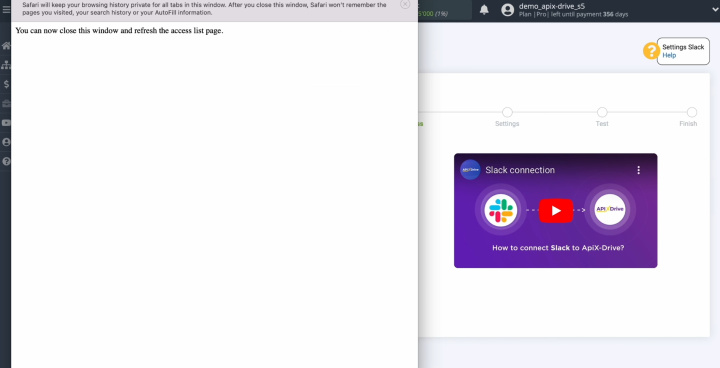
Close the
window and reload the page.
![Tally and Slack integration | Close the window and reload the page Tally and Slack integration | Close the window and reload the page](/media/blogimg/w720/en/022b89fe64b47f73c54a6c22c780b36e.jpg)
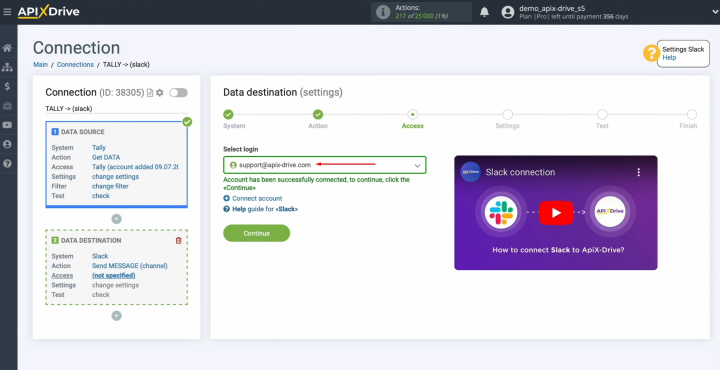
When the
connected login appears in the list of active accounts, select it and click
"Continue".
![Tally and Slack integration | Select the connected login Tally and Slack integration | Select the connected login](/media/blogimg/w720/en/47d21d5b1e01f965f4b7802582727eae.jpg)
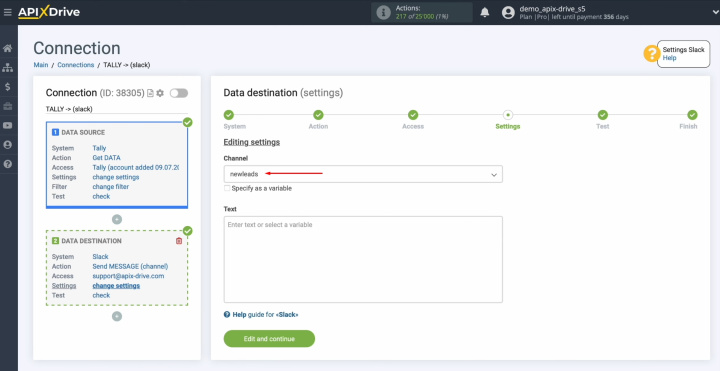
Select the
channel to which new messages will be sent.
![Tally and Slack integration | Select the channel to which new messages will be sent Tally and Slack integration | Select the channel to which new messages will be sent](/media/blogimg/w720/en/96abce89554228cf3e6dcb15c9cebf5b.jpg)
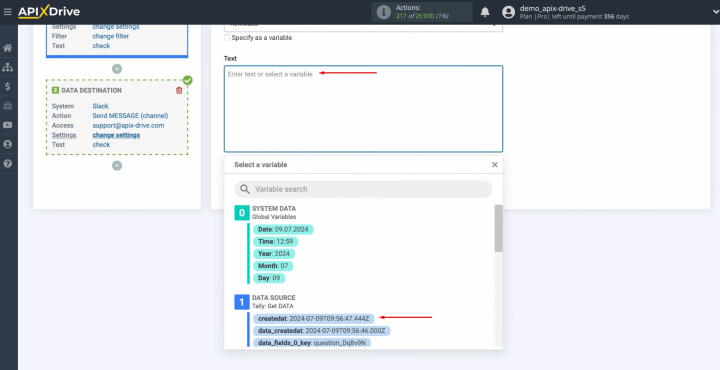
In the text
field, you can assign variables from Tally. To do this, click in the field and
select a variable from the drop-down list.
![Tally and Slack integration | Click in the field and select a variable from the drop-down list Tally and Slack integration | Click in the field and select a variable from the drop-down list](/media/blogimg/w720/en/8c73e27160cea093087a8fdd06979f3d.jpg)
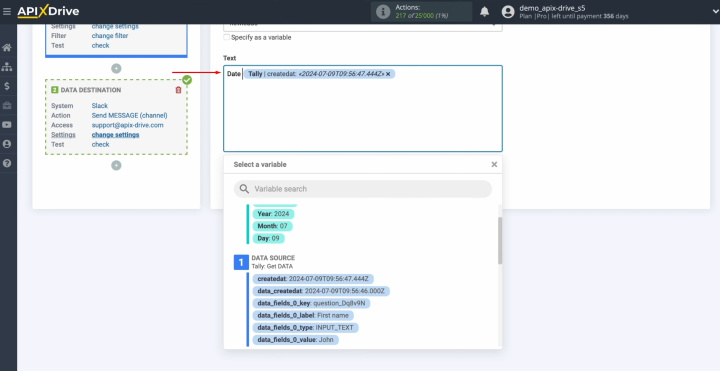
Please note
that you can use not only variables but also enter values manually. To go to the next line, use
"Enter".
![Tally and Slack integration | You can also enter values manually Tally and Slack integration | You can also enter values manually](/media/blogimg/w720/en/fb66b932737faa75f48beff26cc63e99.jpg)
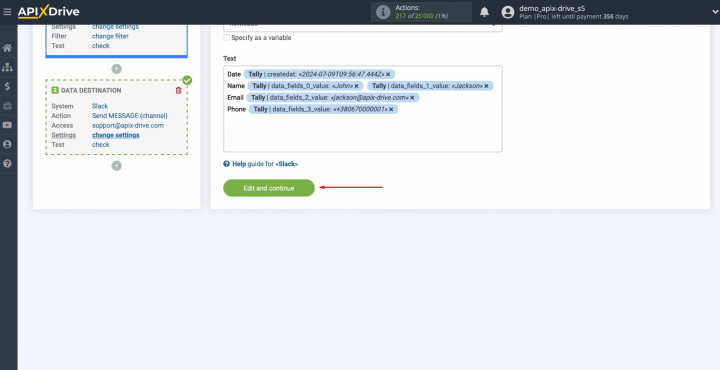
When all
required fields are filled in, click "Edit and continue".
![Tally and Slack integration | Click "Edit and continue" Tally and Slack integration | Click "Edit and continue"](/media/blogimg/w720/en/25c3d2329ccdbb2779ecb80a847df79b.jpg)
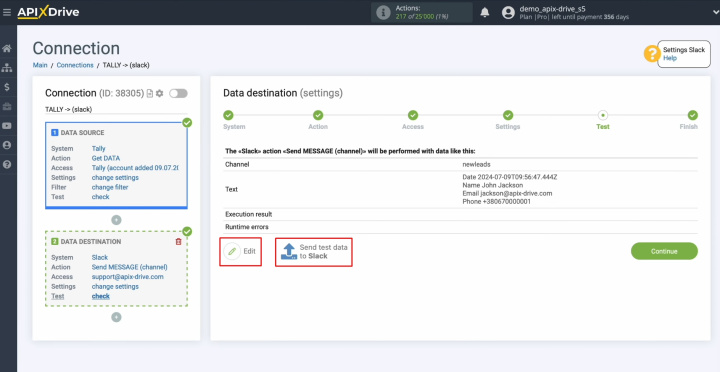
Now, you see an
example of the data that will be sent to Slack in the selected channel
with each new lead from Tally. If you are not satisfied with something, click
"Edit", and you will go back a step. In order to check the correctness of
the settings, click "Send Test Data to Slack".
![Tally and Slack integration | Click "Edit" or "Send Test Data to Slack" Tally and Slack integration | Click "Edit" or "Send Test Data to Slack"](/media/blogimg/w720/en/b8026ddb80a1cde283e66e3691da4572.jpg)
After
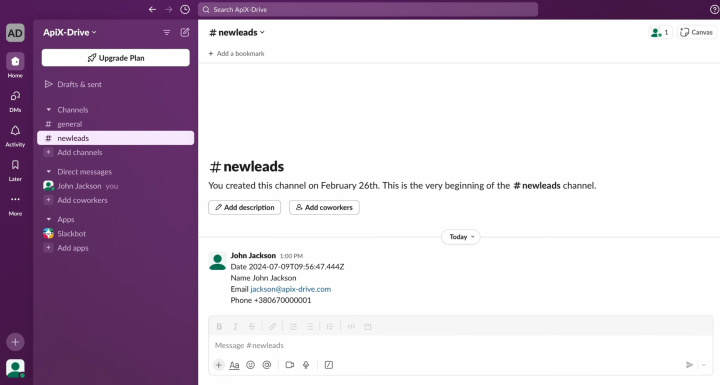
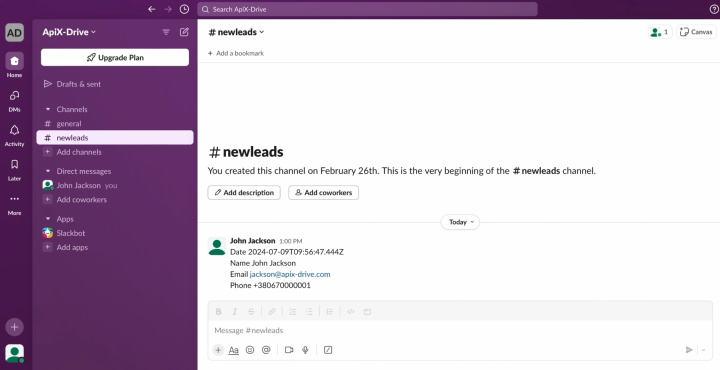
successful sending, go to Slack and check the result.
![Tally and Slack integration | Go to Slack and check the result Tally and Slack integration | Go to Slack and check the result](/media/blogimg/w720/en/2f2b3486fd22654651e798146f38327c.jpg)
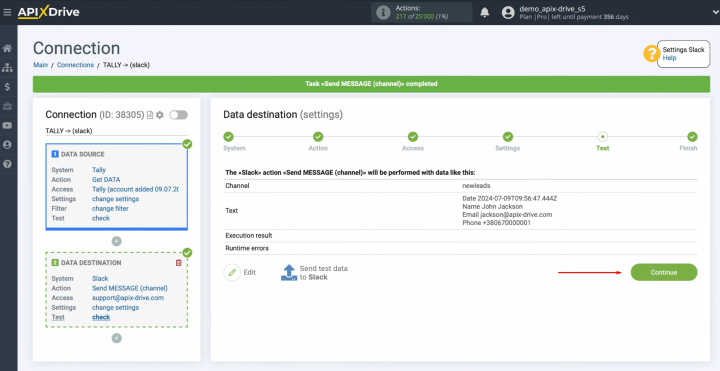
Return to ApiX-Drive and continue setting up.
![Tally and Slack integration | Return to ApiX-Drive and continue setting up Tally and Slack integration | Return to ApiX-Drive and continue setting up](/media/blogimg/w720/en/0d9f84d320630f0dd0b27bee6b33ab86.jpg)
This completes the setup of Slack as a data receiver.
Setting Up Auto-Update
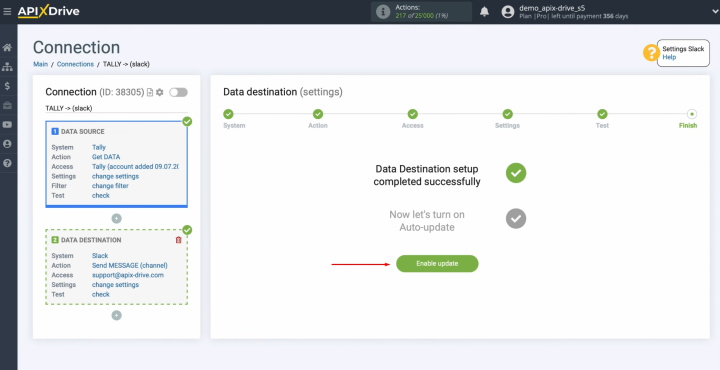
In order for data transfer to occur automatically, configure auto-update. Click on the green button “Enable update”.
![Tally and Slack integration | Click on the green button “Enable update” Tally and Slack integration | Click on the green button “Enable update”](/media/blogimg/w720/en/86046f7e5a980f7cf76f2e35fa322282.jpg)
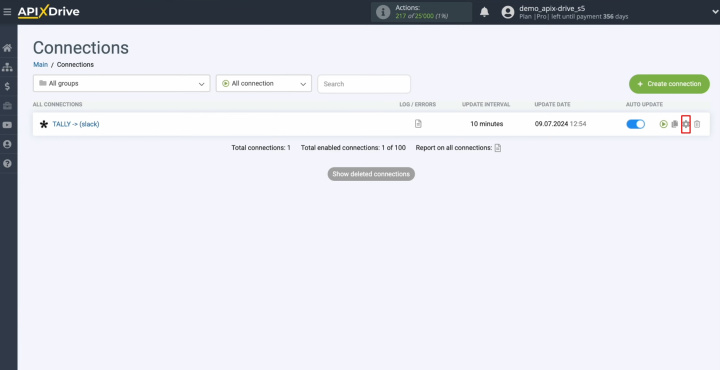
Click on the
gear button.
![Tally and Slack integration | Click on the gear button Tally and Slack integration | Click on the gear button](/media/blogimg/w720/en/acc949d391dc1101767c406b1b1328dc.jpg)
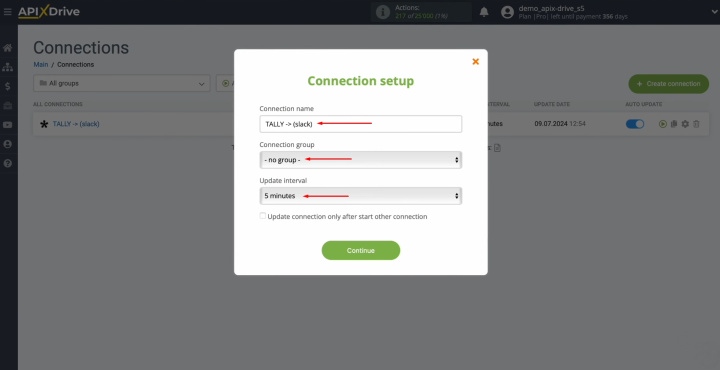
Select the
interval for the data update. For example, once every 5
minutes. Moreover, here you
can change the name of the connection and assign it to the required group.
Click “Continue”.
![Tally and Slack integration | Select the interval for the operation of the connection Tally and Slack integration | Select the interval for the operation of the connection](/media/blogimg/w720/en/85d9b09154c54f4a94de1cae8209ef39.jpg)
That's all. Tally and Slack integration was completed. You did it. Congratulations!
What Will You Get
Using ApiX-Drive to automate lead data transfer is a progressive approach to optimizing business processes. Working with this tool does not require programming skills. It allows even users with minimal experience to create complex automated processes. Following our instructions for setting up Tally & Slack integration and activating auto-updates, you will ensure stable interaction between both systems.
Slack & Tally integration will free you from the need to perform monotonous and boring tasks the obsolete way – manually. The data transfer process will be automated. This task is taken over by our online connector ApiX-Drive. While routine work will be delegated to it, you will be able to focus on improving customer interactions, mastering new marketing strategies, and other key aspects that will help take your business to the next level.